Have a Rover account? This guide will get you up and running with Rover and location based messaging for your mobile app. First, watch the video below for an in-depth walkthrough
Before you can started sending messages, the Rover SDK must be installed into your iOS and or Android Mobile app. Both of these SDKs can be installed through Cocoa Pods on iOS and JCenter Maven repository on Android. We have outlined full instructions for installing the SDK on our github.
View install instructions for:
iOS AndroidIf you have carefully followed the installation instructions and can not get the Rover SDK to correctly install, please file an issue in the appropriate github repository. Our developers will follow up shortly.
As part of your installation, you may wish to include a Rover Inbox. The Rover inbox contains all of the message data that has been delivered to a customer. The SDK provides ONLY the data for the Inbox, however you can view example projects to understand how to easily render this data into UI.
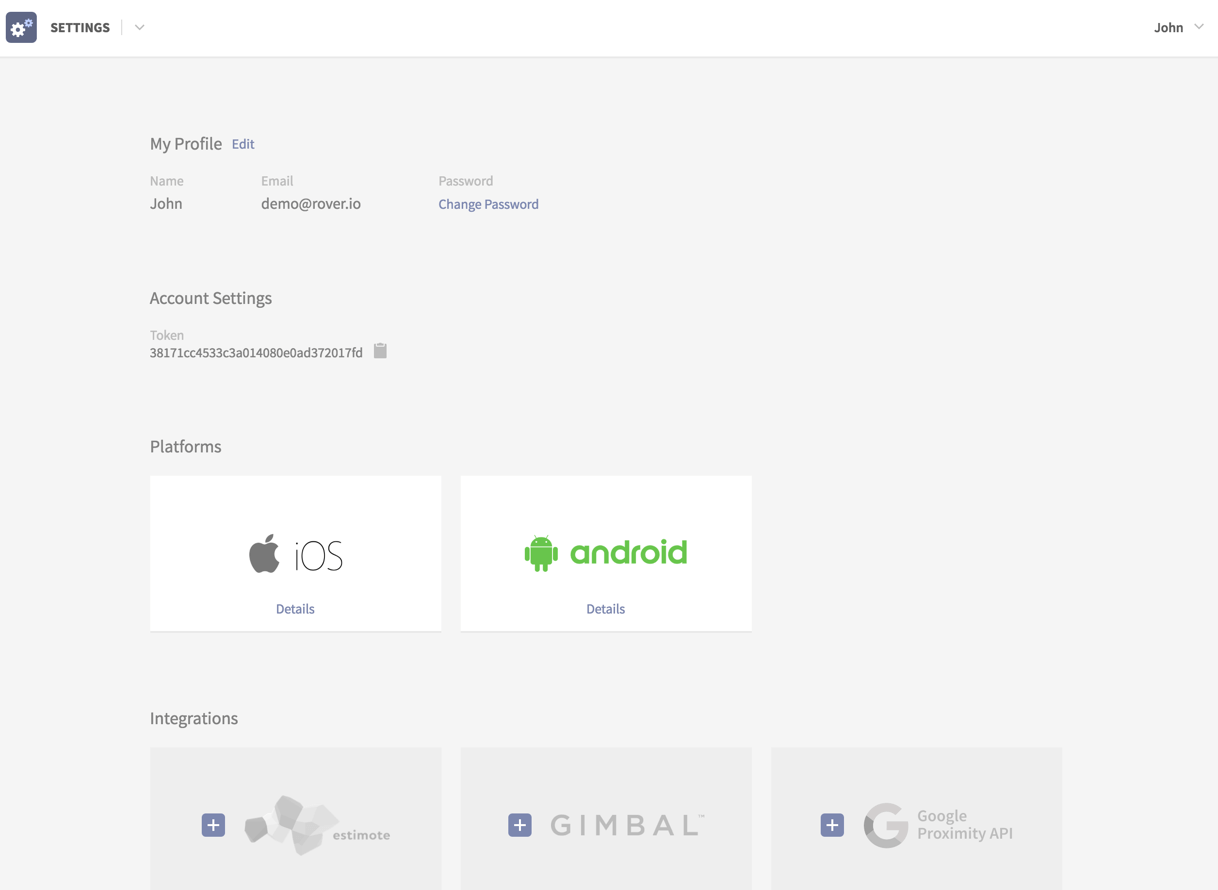
Rover Inbox Rover InboxOnce you have the SDK installed, open the settings app in the Rover Admin console. You likely had to visit this app already in the SDK installation process when grabbing your app token. There are several important steps you must complete here to ensure push notifications will work on both platforms, and that Android devices will be able to detect beacons.
If you would like to receive any push notifications (beacon, geofence or scheduled) you must add an APNS certificate. We have created a detailed step-by-step guide for creating this certificate.
APNS GuideIf you would like to receive any push notifications (beacon, geofence or scheduled) you must add an APNS certificate. We have created a detailed step-by-step guide for creating this certificate.
FCM GuideTo detect beacons on Android, they must be registered with Google's Proximity API. This ensures the most battery efficient and stable method for beacon detection on Android to-date. Simply select the 'Google Proximity API' in the settings page and follow the instructions.
After this integration, all existing beacons in your Rover proximity app will be registered with Google. IMPORTANT: You can only register beacons with a Google project once! Thus if you are using a testing project, only register test beacons, not production ones.
The Rover Proximity App allows you to add both beacons and places (containing geofences). To add a beacon, ensure you are in the beacon tab (top navigation bar) and click the '+ Add Beacon' button. Name the beacon, and then fill in the configuration data based on the beacon protocol. Generally you can find this information through your beacon hardware provider's app or web console.
It's very important that you tag your beacons, since you use tags to target messages. To add tags, just click on a beacon to bring up its details, and add as many tags as you want. Tags are also very useful for scaling your infrastructure. Say you have 100 beacons deployed at 100 of your locations, installed at the store entrance. By tagging these as 'Store Entrance', you can easily link them to a message with one tag. However, say you only wanted customers in a specific region of the country to receive a certain message. By adding another tag like 'Southwest' you can then target just those 25 by using both tags 'Store Entrance' and 'Southwest'.
Switch over to the 'Places' tab at the top to view your places. Places can contain 1 geofence and multiple beacons. If you add a beacon to a place, it will also be added into your Beacons listing. If you already have a beacon you wish to add to a place, go to the 'Beacons' tab, select the beacon, and enter the Place in the field provided.
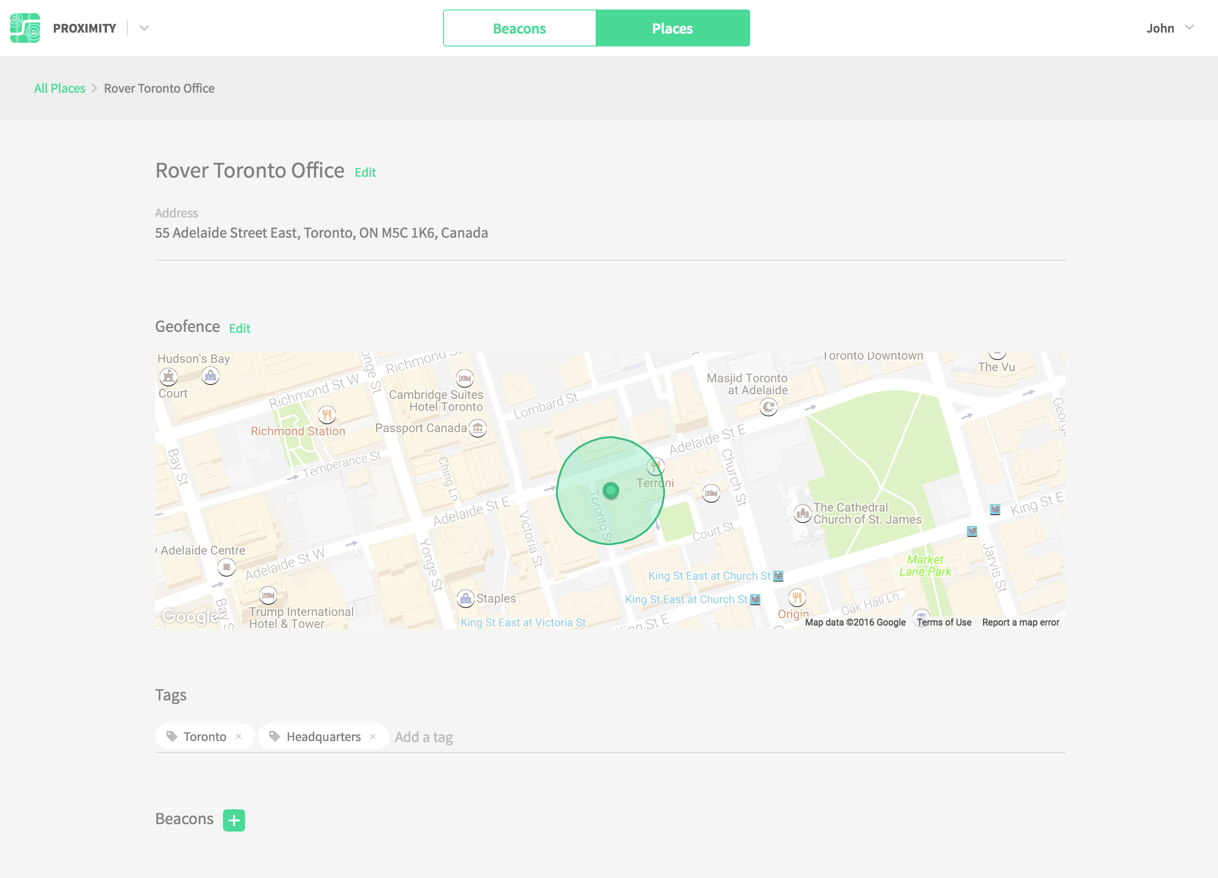
Click 'Add Place' to create a new place, and fill in the address. Select the address from the dropdown which matches yours. This will automatically create a geofence for that place. To edit the geofence, click to open its details. Next to Geofence click the 'Edit' button, where you can resize the radius and reposition the marker.
Similar to beacons, you can use tags to easily target messages to geofences. You can also use places to filter beacons. For example you can deploy a message to beacons tagged 'Store Entrance', but only if the beacon belongs to a place tagged 'California'.
The Rover Message App allows you to send both beacon & geofence triggered messages, as well as real-time or scheduled push messages. To get started open the Messages App, ensure 'Proximity' is selected in the top nav bar, and then click 'New Message.'
This will prompt open the Rover Message Creator, which guides you step-by-step through the process of authoring a message. First give the message a title in the top left so it can be easily identified in your message listing. This will never be displayed to a customer. Next write a push notification that should alert customers when they have entered a proximity region.
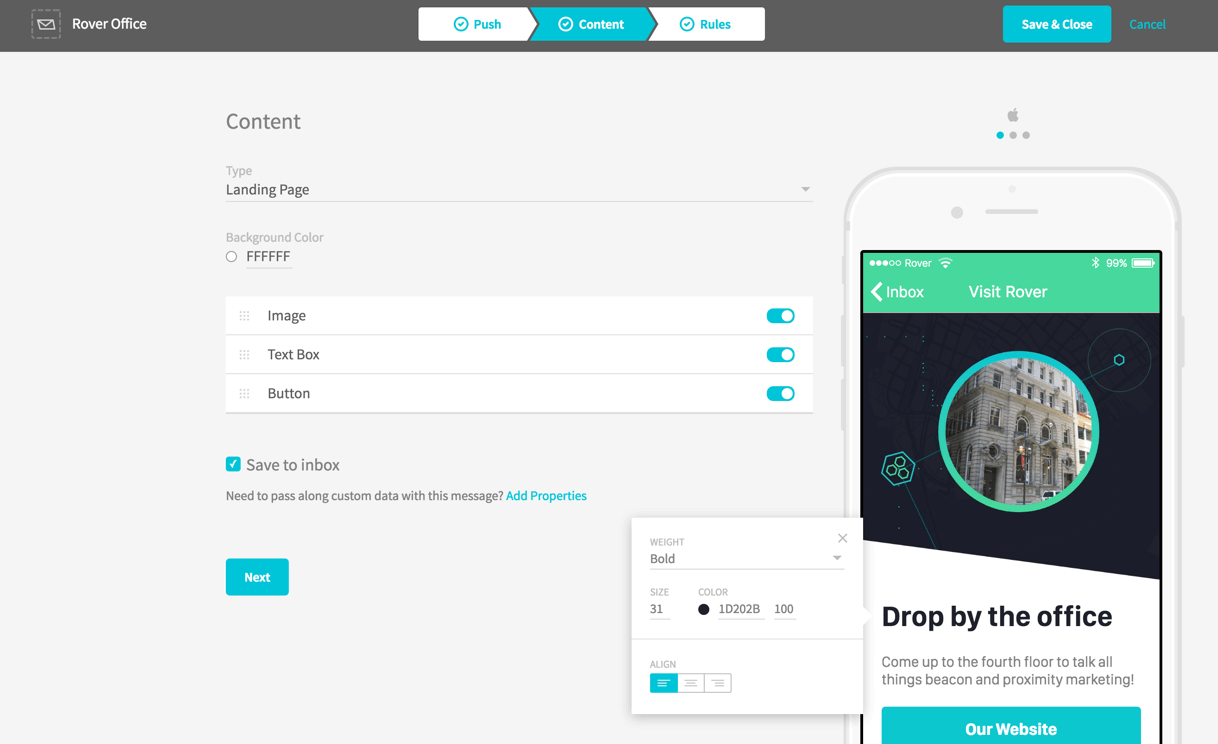
You can attach different types of content that will display when a customer clicks on the notification from the previous step. They are as follows:
Landing pages are generally a good place to get started, as they provide the ability to quickly author your own content. You can include an image, textbox and button, and style these however you need to match the look and feel of your own app. You can also style the title bar however you like, or you can select for it to inherit the existing navbar styles your app already uses.
By default all messages will be saved to the customer's Rover Inbox, which gives you a data source to easily render lists of messages they have previously received. For more information on the inbox:
Rover Inbox Rover InboxWhen setting the content to use an external website, you'll notice that the website may not load in the preview. This is normal, as many sites prevent external websites from embedding them. Rest assured the website will be loaded correctly on the actual device.
Deeplinks and Custom Data integrations cannot be previewed so it is important to test these before deploying.
After deciding the message content, you must define where, when and how many times this message should be delivered.
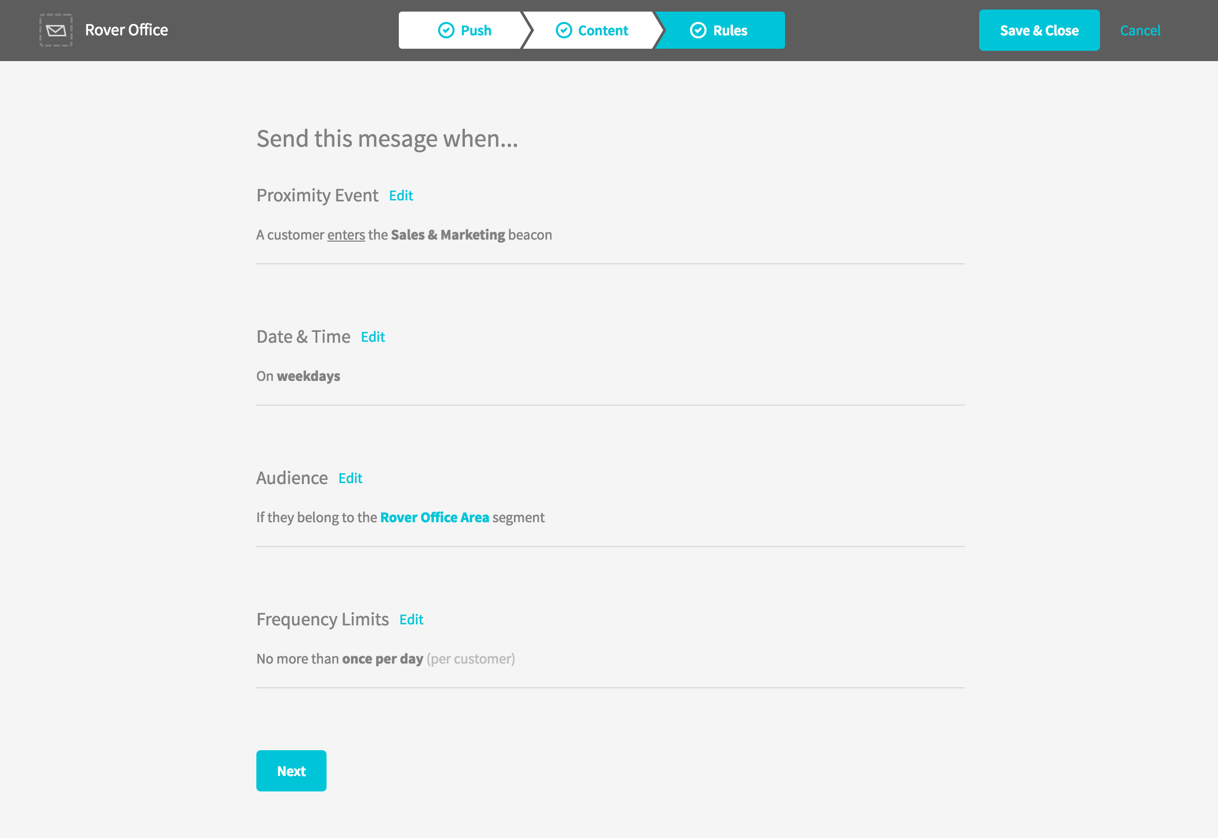
By default the message will trigger when a customer enters ANY beacon in your proximity app. Click edit, and change the rule to be more specific. Here is where you can use tags to link this message to many beacons. Select 'Beacons Tagged' and then enter the beacons you wish to target. Multiple tags are joined by AND statements. So if you use tags 'Entrance, Southwest Region' it will only target beacons with BOTH those tags, not one or the other. If you want to only try this message on a test beacon, you can select a specific beacon by name. To make this a geofence triggered message, simply select the appropriate action from the first event dropdown.
Edit the time and day to limit when this message can be sent. All dates and times are based on the customer's local device time
You can limit the customer audience to a specific segment. These can be created in the Customers App. By default, the message is set to be delivered to all customers.
Decide how often you want this message to be sent. By default the limits are set to once a day. You can add multiple limits that layer on top of each other (1x per day, 2x per 30 days). IMPORTANT! When testing, we suggest increasing the limit to a high number (50x a day) or removing the limit entirely so you don't need to wait to re-test quickly. Please remember to set limits back on when you are ready to deploy.
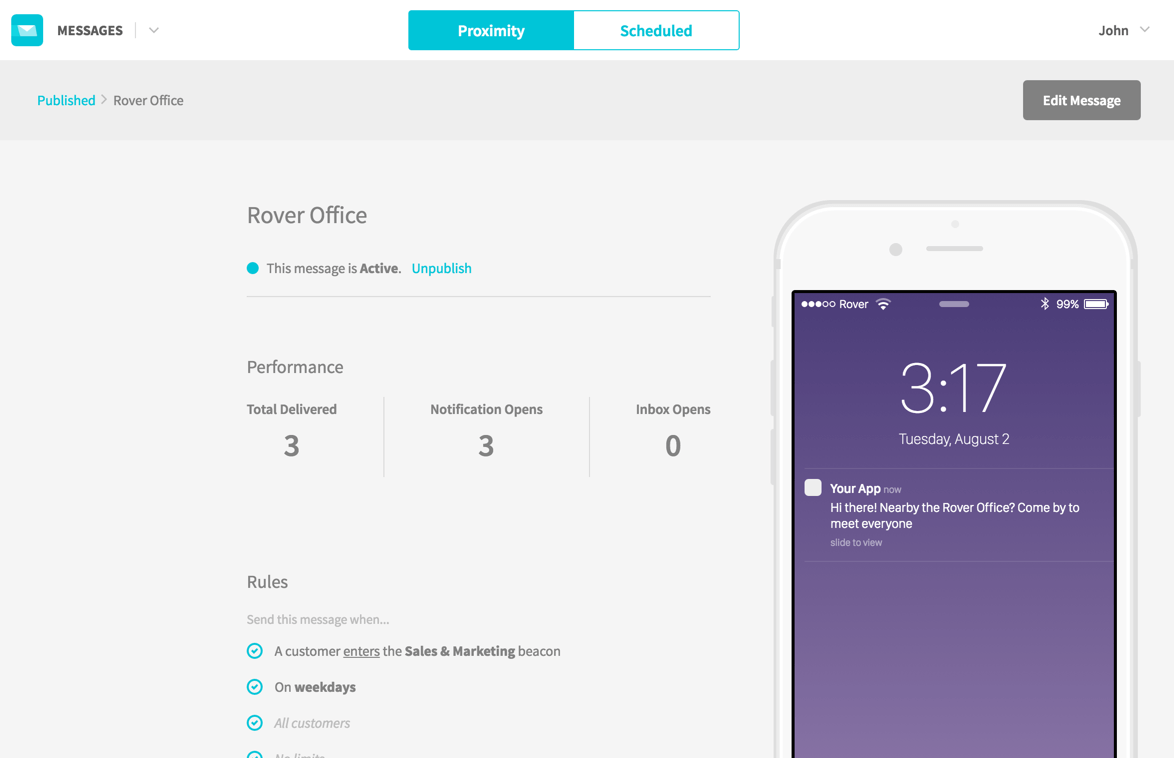
The final step is to publish. Here you can review all the details about the message. If you are ready to go live, then hit the publish button, and customers will start to receive the message when they trigger the appropriate proximity event. Otherwise you can save it as a draft, to return to later.
Once published you can click on the message to get a quick sense of its performance in terms of deliveries and opens. If you need to unpublish it, just click the 'Unpublish' link near the title. You can also edit the message, although edits will not be sent to customers who had previously received the message.
You can also send messages without the need for any proximity events through the 'Scheduled' tab in the Rover Messages App. The process is very similar to creating proximity messages, with one difference: Instead of a Rules tab there is a Delivery tab, which will allow you to define when the message should be sent.
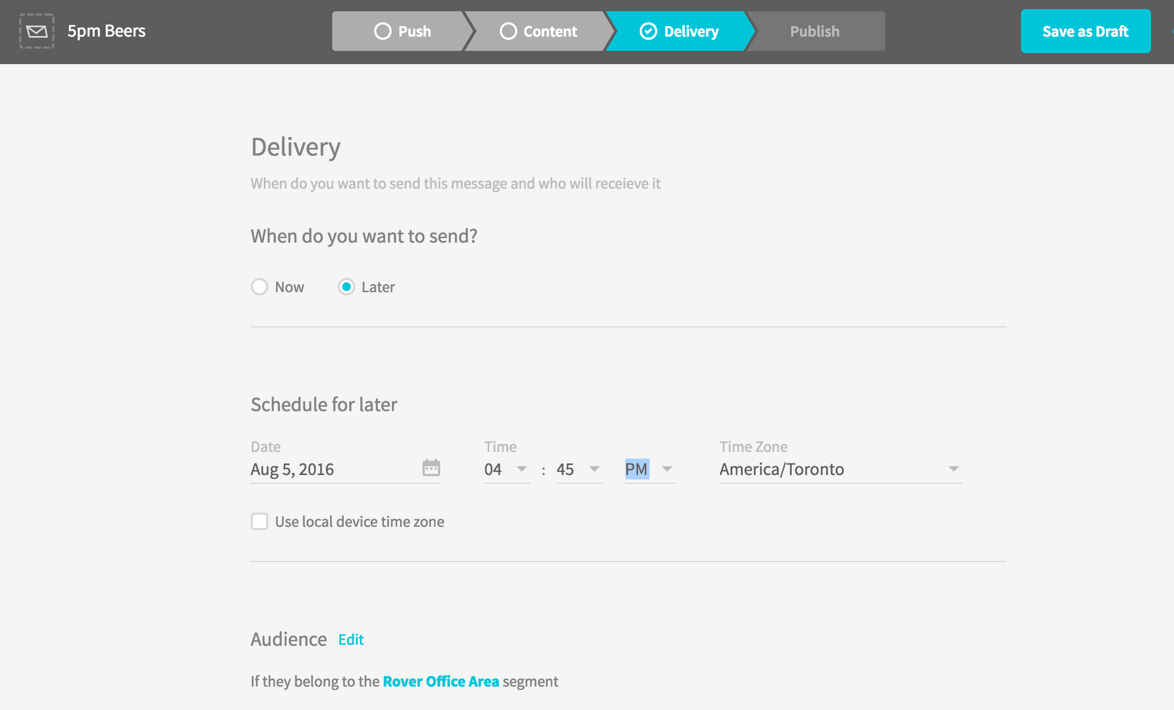
If you select to send the message 'now' it will be sent immediately after you click publish on the last step. Otherwise you can select a date and time in the future (Up to 60 days) to schedule the message for.
Here are some common questions you may have while getting started:
We suggest setting up a test beacon you can easily turn on or off (or enter and exit). Set your message to trigger when a customer enters that specific beacon. There are useful tools like Air locate which you can use to simulate beacons for this purpose.
Have you added your APNS (iOS) and FCM (Android) certificates? There are required for BOTH proximity and scheduled messages.
Have you integrated the Google Proximity API? This is required if you are intending to detect beacons on Android. You can find this integration in the Settings app.
You may have a limit on your message that is making it difficult to test. By default, messages are given a once per day limit. We suggest removing this during testing.
If you are having an issue with installing the SDK, please file an issue for iOS or Android. If you are having issues in the Rover Admin Console, or for more general inquiries, please email us at support@rover.io
814 Mission Street
Suite 600
San Francisco, CA
94105
55 Adelaide Street East Suite 410
Toronto, ON
M5C 1K6
